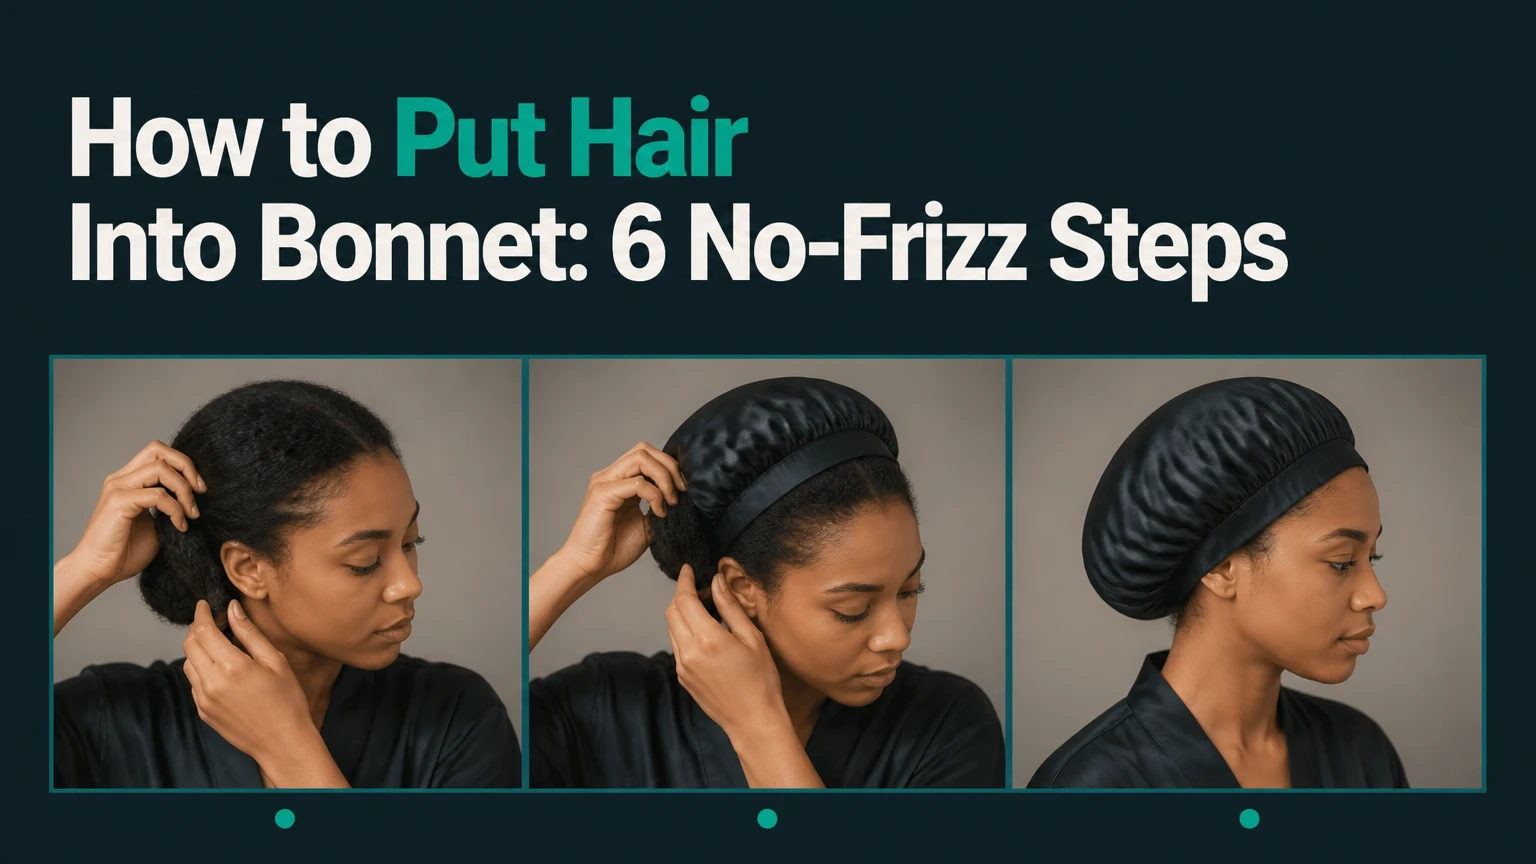
To put hair into a bonnet, bend forward, gather the hair loosely at the crown, place the bonnet’s front edge at the forehead, and guide all hair into its pocket before pulling the back edge over the nape. The bonnet should contain the hair without compressing curls, tugging edges, or leaving a tight mark on the skin.
Key Facts at a Glance
A bonnet works by reducing hair-to-pillow friction, not by repairing existing breakage.
The bonnet’s smooth lining must touch the hair; seams and rough labels should face outward.
Hair should be dry or nearly dry before covering, especially at the scalp.
Curly hair usually fits best with a bend-and-scoop or loose pineapple method.
A bonnet should feel secure without causing pain, headache, itching, or a forehead groove.
Typical application takes 1-3 minutes, while a suitable bonnet often costs $5-$50.
What You Need Before You Put Hair Into a Bonnet
A suitable bonnet, a dry hairstyle, clean hands, and one loose hair tie are usually enough. A wide-band satin or silk bonnet should fit over the entire hairstyle without forcing the ends into a tight ball.
Avoid applying a large amount of oil immediately before covering the hair. Excess product can transfer to the lining, attract lint, and increase the washing frequency needed to keep the bonnet fresh. A small amount of leave-in conditioner or styling cream is usually easier to distribute evenly.
| Item | Typical amount or specification | Purpose |
|---|---|---|
| Bonnet | 1, standard or XL pocket | Covers the full hairstyle |
| Satin scrunchie | 1, 2-3 cm diameter loop | Creates a loose pineapple |
| Leave-in product | Pea-sized amount | Reduces dryness without soaking hair |
| Preparation time | 1-2 minutes | Detangles and organizes hair |
| Bonnet application | 30-60 seconds | Encloses the hair |
| Hair condition | Dry or nearly dry | Limits tangling and scalp dampness |
Check the bonnet’s orientation and size
Find the smooth inner lining, elastic or drawstring edge, and deepest part of the pocket. The smooth surface belongs against the hair, while the seam, tag, and rough stitching should remain away from the hair shaft.
Measure around the head above the eyebrows and around the fullest area at the back of the skull if the bonnet slips frequently. Hair volume matters as much as head circumference. A person with short, fine hair may need a standard cap, while long curls, dense coils, braids, and locs usually require an XL or elongated bonnet.
| Hair situation | Useful bonnet specification | Typical pocket requirement |
|---|---|---|
| Short, fine hair | Standard cap, wide elastic | 10-15 cm depth |
| Shoulder-length curls | Oversized cap, smooth lining | 15-25 cm depth |
| Waist-length curls | XL or elongated cap | 25-40 cm depth |
| Box braids or locs | Tube or extra-long bonnet | 40-70 cm length |
| Thick protective style | Adjustable perimeter | 55-65 cm head opening |
How to Put Hair Into Bonnet in Six Steps
The complete process takes about 1-3 minutes and requires six actions: prepare, bend, anchor, scoop, pull, and adjust. The factor that determines success is pocket space, because a bonnet that is too small will crush the hairstyle or force the elastic to sit under tension.
Step 1: Dry and prepare the hair
Allow freshly washed hair to dry fully, or dry the roots and scalp before covering them. Separate large tangles with your fingers, then apply only the amount of leave-in conditioner or oil your hair normally absorbs.
Curly and coily hair should not be brushed dry if brushing disrupts the pattern. Straight hair can be gently combed, wrapped, or gathered according to the style you want to preserve.
You’ll know it worked when: the scalp feels dry and the hair moves into one loose group without snagging.
Common mistake: covering wet roots because the lengths feel dry. Damp scalp hair can stay humid for hours inside a close-fitting cap.
Step 2: Bend forward and let the hair fall
Bend at the waist or tilt your head forward so the hair hangs toward the floor. Keep the neck relaxed and let gravity separate the lengths instead of pushing the hair into a compact bundle.
This position is especially effective for curls, coils, waves, and layered hair because it preserves volume at the crown. People with dizziness, neck pain, or very long hair can use the upright method described below instead.
You’ll know it worked when: the ends hang in front of your face or toward the floor, with the roots still at the crown.
Common mistake: gathering the hair at the nape first. That creates a low lump that can pull against the bonnet while you sleep.
Step 3: Place the front edge at the forehead
Open the bonnet with both hands and place its front edge across the forehead, either at the hairline or 1-2 cm above it. Keep the center of the opening aligned with the nose and crown rather than placing one side higher than the other.
Do not stretch the elastic as far as possible. Use enough tension to keep the edge in place while leaving room for two fingertips beneath the band.
You’ll know it worked when: the bonnet stays at the forehead while the hair remains outside the pocket and hanging forward.
Common mistake: placing the elastic directly on delicate baby hairs and then pulling it backward. Positioning the band slightly above fragile edges can reduce repeated rubbing.
Step 4: Scoop every length into the pocket
Use both hands to guide the hanging hair upward and backward into the bonnet. Start with the ends, then collect the middle lengths, and finish by placing the crown hair inside. This order reduces the chance of trapping ends beneath the band.
For dense or long hair, divide the hair into two loose handfuls rather than compressing everything with one fist. Spread the hair across the pocket so the bonnet supports the style evenly.
You’ll know it worked when: no ends remain outside and the hair is distributed across the bonnet instead of forming one hard knot.
Common mistake: stuffing the hair forcefully into a standard cap. Use an XL bonnet when the pocket cannot hold the hair without compression.
Step 5: Pull the back edge over the nape
With the hair inside, pull the rear edge over the crown and down toward the nape. If the bonnet has a drawstring, tighten it until the cap stays in place, then stop before the band presses into the skin.
A wide elastic band usually spreads pressure more evenly than a narrow cord. An adjustable cap is useful when the same wearer alternates between loose hair, braids, and a high-volume wash-and-go style.
You’ll know it worked when: the cap remains on during a slow head turn and the band does not pinch behind the ears.
Common mistake: tying the drawstring into a tight knot. A tight knot can create a pressure point and may pull against the hairline.
Step 6: Tuck, spread, and perform the fit test
Tuck stray ends into the pocket with your fingertips, then spread curls or coils across the interior rather than pressing them flat. Check the front, sides, and nape in a mirror if the style is fragile.
Perform a three-part fit test: insert two fingertips under the band, turn the head left and right, and remove the cap after 10 minutes if the forehead feels hot or irritated. A secure bonnet should not cause pain, numbness, itching, or a persistent red line.
You’ll know it worked when: the hairstyle is contained, the front edge stays level, and the cap feels present but not tight.
Common mistake: using pins through the cap near the temple. If anchoring is necessary, use flat pins through the band behind the ears, never through the hair or scalp.
Which Bonnet Method Fits Your Hairstyle?
The bend-and-scoop method suits loose curls and volume, the pineapple method suits long curls and coils, and a wrap or loose top knot suits straight and relaxed hair. Protective styles need space more than compression, so an elongated bonnet is often safer than a standard round cap.
| Hairstyle | Recommended method | Tie or wrap detail | Main risk |
|---|---|---|---|
| Short curls | Bend and scoop | No tie, or loose band | Flattened crown |
| Long curls | Loose pineapple | One scrunchie loop | Crown tension |
| Dense coils | Two-section scoop | No tight ponytail | Compressed ends |
| Straight blowout | Loose wrap | Flat pins or scarf base | Creases and dents |
| Box braids | Side or back gather | Loose fabric tie | Folded braid pattern |
| Locs | Extended pocket | Adjustable perimeter | Excess weight and heat |
How do you bonnet long curls and coils?
Gather long curls loosely at the highest practical point, using one soft scrunchie loop to create a pineapple, then place the bonnet over the back of the head and guide the ends into the pocket. Do not make a tight ponytail, because the elastic can create concentrated tension at the crown.
For hair that reaches the waist, make two loose side sections instead of one high bundle if the pineapple bends the roots uncomfortably. An XL bonnet should hold the lengths without requiring repeated folding.
How do you put straight or blow-dried hair into a bonnet?
Wrap straight hair loosely around the head in the direction that preserves the style, secure only the difficult sections with flat pins, and slide the bonnet from the back toward the forehead. A satin scarf beneath the bonnet can hold a wrap flatter, but it may reduce volume at the crown.
A loose top knot works for straight hair that does not need a polished wrap. Avoid ordinary rubber bands because they can leave a crease and increase friction during removal.
How do you cover braids, locs, and extensions?
Place braids or locs into a side, back, or crown arrangement that does not bend the style sharply, then use an elongated bonnet with enough depth to contain the full length. Do not force long braids into a short cap, because repeated folding can distort the pattern and add weight to the roots.
Extensions need extra space because added length and attachment points increase the load inside the pocket. Keep the perimeter comfortable and inspect the hairline regularly for tenderness.
Silk or Satin: Which Bonnet Should You Choose?
Silk is a natural fiber with stronger breathability and a higher price, while satin describes a smooth weave or finish that may be made from polyester, nylon, silk, or a blend. For most users, a well-constructed polyester satin bonnet provides the essential low-friction benefit at a lower cost; silk is preferable when heat, sensitivity, or breathability matters.
| Bonnet material | Typical price | Care requirement | Best use |
|---|---|---|---|
| Polyester satin | $5-$15 | Machine or hand wash, depending on label | Budget protection |
| Nylon satin | $6-$18 | Cool wash, low heat | Durable everyday use |
| Mulberry silk | $25-$50 | Hand wash or delicate wash | Breathability and sensitive skin |
| Silk blend | $15-$35 | Delicate wash | Lower-cost natural-fiber option |
| Satin-lined cotton | $10-$30 | Machine-wash outer fabric | Firm outer structure |
| Silk-lined cap | $20-$45 | Delicate lining care | Structured protective styles |
The American Academy of Dermatology recommends avoiding hairstyles that continually pull on the hair, and its practical rule is direct: “If a hairstyle hurts, it’s too tight.” That guidance applies to bonnet bands and the loose styles worn underneath them, not only to braids or ponytails.
Silk and satin reduce surface drag, but neither material prevents breakage caused by chemical damage, high heat, tight styling, inadequate detangling, or rough removal. A satin bonnet also does not moisturize hair. It can reduce transfer of some products to bedding and reduce friction, but the hair still needs an appropriate conditioning routine.
Bonnet versus satin pillowcase
A bonnet provides more complete containment, while a satin pillowcase remains useful when the bonnet slips or the wearer cannot tolerate headwear. A pillowcase cannot reliably protect a hairstyle from movement in the same way a properly fitted bonnet can.
| Feature | Bonnet | Satin pillowcase | Silk scarf |
|---|---|---|---|
| Hair containment | Full pocket | None | Partial wrap |
| Slipping risk | Medium, fit-dependent | None from headwear | Medium |
| Crown volume | Usually preserved | Often preserved | Can flatten |
| Edge pressure | Possible | None | Possible |
| Typical price | $5-$50 | $15-$80 | $8-$40 |
The strongest setup for restless sleepers is often a bonnet plus a satin pillowcase. The pillowcase provides a lower-friction backup if the cap comes off, while the bonnet contains curls during the first part of the night.
How Tight Should a Bonnet Be?
A bonnet should stay in place with light tension and allow approximately two fingertips beneath the band. Headache, itching, numbness, tenderness, or a lasting red mark means the bonnet is too tight, incorrectly positioned, or too narrow for the wearer’s head.
| Fit symptom | Likely cause | Immediate correction |
|---|---|---|
| Forehead groove after waking | Narrow or overstretched elastic | Use a wide band or loosen toggle |
| Headache within 30 minutes | Excess perimeter pressure | Remove and refit above hairline |
| Hairline tenderness | Tension from gathered hair | Loosen style and change placement |
| Bonnet falls backward | Opening too large or smooth outer fabric | Choose adjustable perimeter |
| Curls crushed at crown | Pocket too shallow | Select oversized bonnet |
| Sweaty scalp | Nonbreathable fabric or excess product | Use silk or lighter lining |
A bonnet that falls off is not always too loose. A shallow pocket can push against the crown and gradually force the cap backward, while a heavy braid arrangement can pull the entire bonnet out of position. Correct the hairstyle or pocket depth before tightening the edge.
Do not use tight bobby pins as a substitute for correct sizing. If pins are needed, place one flat pin behind each ear through the band only, and remove them if they cause tenderness.
Common Bonnet Mistakes and How to Fix Them
Most bonnet problems come from moisture, compression, tension, contamination, or incorrect material orientation. The fix is usually a change in preparation or fit rather than a more expensive product.
Covering damp hair
Damp hair is more vulnerable to stretching and mechanical damage, and a covered damp scalp stays warm and humid. Hair should be dry at the roots before overnight coverage, particularly when the wearer has a sensitive scalp or applies leave-in products.
If dampness is unavoidable, use a short daytime covering period and remove the bonnet as soon as possible. Do not treat a bonnet as a drying cap.
Making the pineapple tight
A tight pineapple places force at a small area of the crown and can leave a crease. Use one loose scrunchie loop, or divide the hair into two relaxed sections when the length is heavy.
The AAD links repeated pulling to traction alopecia, a form of hair loss caused by sustained tension. Pain is an early warning signal, not evidence that the style is working.
Using the wrong side of satin
Some reversible caps have one satin side and one textured side. Place the smoothest side against the hair, then check that the seams do not sit directly on fragile edges.
A satin exterior does not guarantee a satin interior. Read the product construction carefully.
Washing the bonnet too rarely
A bonnet collects sweat, scalp oil, skin cells, and styling residue. Wash it according to use, typically every 3-7 nights for frequent wear and sooner when the lining feels oily or smells stale.
Use a mild detergent, cool water, and low mechanical agitation. Heat from a dryer can shorten elastic life and damage silk fibers.
Forcing too much hair inside
Stuffing a large hairstyle into a small pocket creates compression, tangling, and uneven pressure. Choose a deeper cap or change the arrangement before pulling the band into place.
A larger bonnet is not automatically better if its opening slides over the eyes. The pocket and perimeter must both match the wearer.
Typical Cost, Care, and Replacement Schedule
Typical bonnet prices range from $5-$15 for polyester satin and $25-$50 for mulberry silk, although designer construction, handmade sizing, and specialty lengths can increase the price. Replace a bonnet when the elastic no longer holds gently, the lining develops rough patches, or washing cannot remove product buildup.
| Bonnet type | Typical cost | Typical service period | Replacement trigger |
|---|---|---|---|
| Basic polyester satin | $5-$12 | 6-12 months | Stretched elastic |
| Double-lined satin | $10-$25 | 9-18 months | Frayed seam or lining |
| Mulberry silk | $25-$50 | 1-2 years | Thin or torn silk |
| XL braid bonnet | $12-$35 | 6-18 months | Pocket distortion |
| Adjustable sleep cap | $15-$40 | 9-18 months | Failed toggle or strap |
Hand-washing silk and air-drying it away from direct heat can extend its useful life. Polyester satin usually tolerates more frequent washing, but the care label takes priority over generic material advice.
Situational Variations and Alternatives
A bonnet is useful when hair needs containment, but it is not mandatory for every hairstyle or sleeping preference. A satin pillowcase, silk scarf, loose braid, or carefully arranged hair can provide a lower-pressure alternative when the cap causes heat or irritation.
For short straight hair, a satin pillowcase may offer enough friction reduction without adding a head covering. For long curls, a bonnet usually provides more reliable containment than a pillowcase alone.
For a wig or hairpiece, use only the manufacturer’s care instructions. A tight bonnet can flatten a wig, move a lace front, or create pressure at adhesive edges.
Hair electrolysis requires separate aftercare. A bonnet does not protect electrolysis-treated skin from irritation, and the wearer should follow the electrologist’s instructions about washing, products, heat, and overnight coverage. If treated facial skin is tender, avoid placing a tight band over that area until the provider permits it.
When Should You Avoid Wearing a Bonnet?
Avoid overnight bonnet use when the cap causes pain, persistent itching, scalp tenderness, numbness, or a lasting red mark. Avoid covering wet roots, irritated skin, an active rash, or a wound unless a clinician specifically gives different instructions.
A bonnet also is not appropriate as a substitute for medical treatment of sudden shedding, scalp scaling, painful follicle bumps, or areas of hair loss. Stop using the cap and seek professional advice if symptoms continue after removing pressure and washing the lining.
The American Academy of Dermatology advises prompt attention to signs of traction-related hair loss because continued tension can make the condition permanent. A comfortable bonnet should reduce mechanical stress, not create a new source of it.
Frequently Asked Questions
Can I sleep with wet hair in a satin bonnet?
Sleeping with wet hair in a satin bonnet is not recommended. Wet strands stretch more easily, and the enclosed scalp remains damp for longer. Dry the roots first, use less product, and leave the bonnet off until the hair is dry enough to avoid cold, clammy contact with the scalp.
Why does my bonnet make my hair frizzy?
A bonnet can increase frizz when the lining is rough, the hair is packed too tightly, or the cap moves repeatedly across dry strands. Turn the smooth side inward, choose a deeper pocket, reduce manipulation before bed, and check whether the elastic is rubbing the hairline.
Can I wear a bonnet with bangs?
You can wear a bonnet with bangs if the bangs are arranged loosely and the front edge does not crush them against the forehead. Sweep them in the direction of the finished style, use a smooth scarf layer when necessary, and avoid a tight band directly over the roots.
How often should I wash a hair bonnet?
Wash a frequently worn bonnet every 3-7 nights, or sooner after heavy sweating, oiling, or styling-product use. Follow the care label, use mild detergent, and dry it fully before wearing it again. A dirty lining can transfer residue to the forehead, scalp, and hair.
Can a bonnet cause hair loss?
A properly fitted bonnet should not cause hair loss, but a tight band or tight hairstyle underneath can create repeated tension at the hairline. Pain, tenderness, broken edges, or a persistent red mark indicate that the fit or underlying style needs immediate correction.
Is a bonnet necessary for healthy hair?
A bonnet is optional rather than necessary. Its main value is reducing friction and containing a hairstyle during sleep; a satin pillowcase or loose protective arrangement can provide an alternative. Hair health also depends on gentle detangling, appropriate cleansing, conditioning, and limiting damaging tension and heat.
The Bottom Line
To put hair into bonnet successfully, start with dry hair, bend forward, place the front edge at the forehead, scoop the lengths into the pocket, pull the back edge to the nape, and adjust the fit without tightening it. Choose a larger pocket for curls, coils, braids, locs, or extensions, and replace any cap that causes pain or leaves a persistent mark.
The best bonnet is the one that keeps the hair contained while allowing the scalp and hairline to remain comfortable. A smooth lining can reduce friction, but it cannot compensate for wet hair, tight styling, poor sizing, or an unwashed cap.


